Quick Start Guide
Welcome to Atlas! Here are the most important things you need to know to get started. Watch the video below for an overview and continue reading for more details.
Your Projects
When you sign into Atlas for the first time, you start off with a clean slate. The first thing you'll want to do is create a new project by clicking the "New Project" button.

Creating a New Project
When you click the blue "New Project" button, you'll get taken to a page where you can define the title and description for your project, and choose a project template to pre-populate your new repository with some skeleton files based on the kind of project you're making. Learn more about project templates here.
Click "Create!", and Atlas will add a new repository to your Atlas account, pre-populated with skeleton files based on the project template you chose.
You can also create a new Atlas project by importing an existing project from GitHub or by taking advantage of Atlas' conversion services.
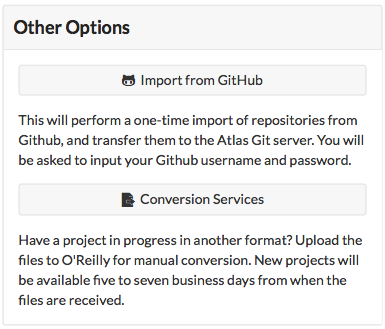
Importing from GitHub
If you have an existing project in GitHub that you want to import into Atlas, you can use the "Import from GitHub" tool. Click this button, authorize Atlas to access your GitHub account, and then you'll see a list of your existing GitHub projects.

Click the "Import" button to the right of the project you want to add to Atlas. Atlas will let you know if it was able to successfully import your files, and will give you a link to get started writing and building.

Conversion Services
If your agreement includes use of these services, the Conversion Services button allows you to upload external source files for conversion to a new Atlas project. Upload Word, InDesign, PDF, or ePub files, and you'll be notified when your converted project is ready--five to seven business days.
Once you have some projects in Atlas, you'll see all your existing projects listed on the Projects page every time you sign in.
Select a project from the list and you'll be taken to the project dashboard, where you'll see a list of all files in the project, and have access to the build tools.
Warning
A Warning About Split Source
When you import a project from GitHub into Atlas, you are essentially creating a copy of the files, that you will be maintaining separately from the files in GitHub. If you want to keep both sets of files up to date, you'll need to add your repositories as a remote on a local checkout. You can learn about remotes here.
The Project Dashboard
The project dashboard is your landing page for each project. It lists all the files and folders in your repo, and lets you manage collaborators, define settings for the different output formats, view past builds, and trigger new builds (more on building below).

From the project dashboard, your next steps will likely be either to start writing or to build your project. Click a file in your Files pane at left to open it in the editor. For more about building, see below.
Writing and Editing
The Atlas editor has two writing modes: the Visual Editor and the Code Editor. The Visual Editor is an online authoring environment similar to a word processor, with a formatting toolbar for tagging and styling your content. Documents created in the Visual Editor are stored as HTML5. The Code Editor allows you to view and edit the underlying HTML5 markup for your document. You can toggle back and forth between the Visual and Code Editors, and changes you make in either mode will immediately be reflected in the other.
While HTML5 is the default markup language for Atlas content, Atlas also supports documents written in Markdown, AsciiDoc, and DocBook XML. All three of these formats can be edited using the Code Editor.
In both writing modes, you can navigate among your files using the Files menu to the left of the screen, create and delete files and folders, upload images, save your project (top-right button in the editor, or use the keyboard shortcut ⌘-s/Ctrl+s) and even attach a custom commit message to each save (hover over the Save button to open the commit message dialog box).
Creating a New File
You can create new files and folders right from the project dashboard: scroll to the bottom of your file listing, and you'll see buttons for creating either a new file or folder. You can also create new files and folders from within the editor: open the Files menu, and click the New File button at bottom left. Give your file a name, and hit Enter.
You can also organize your files into folders. To add a folder, click the New Folder button (next to the New File button). You can then click the folder name in the Files menu to open the folder and create new files within it.
Warning
You can't currently organize your files within Atlas. If you want to move existing files into a folder, you need to do that outside of Atlas using Git.
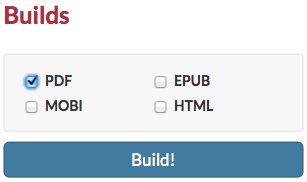
Building
When you're finished writing, it's time to build your project so you can share it with the world. Atlas lets you export your project in four different formats: PDF, EPUB, MOBI, and HTML website.
The first time you build, you'll need to choose what formats to build, and what files and settings you want to apply to each format. You'll do this on the Configure tab of the project dashboard.
Every format has a few different options you can choose. Two options that are common for all formats are:
- Create a table of contents in your built project, based on your section headings. Learn more here.
- Collect all index tags you've added and create an alphabetical index in your built project. Learn more here.
Choose a theme for your project (more on that next), and at the bottom of the Configure page, choose which files to add to the build, drag the files into the correct order, and then save your settings. Then hop back to the Dashboard and start your build. If the build is successful, you'll get a link to download the file. If it fails, you'll get information about what went wrong (the usual culprit is markup errors).
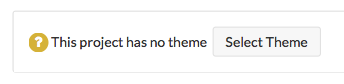
Themes and Design
All of the Atlas output formats (PDF, EPUB, MOBI, and HTML) are powered by CSS, the standard styling language for the Web. You can write an entirely new theme using CSS, that can be used for multiple projects, by multiple people, or you can just add CSS customizations for your specific project.
To apply a theme to your project, choose one of the default themes on the Configure page, or add a link to your own custom theme.
Working Locally
If you'd like to work on an Atlas project locally, please check out Atlas+Git to learn about using Git with Atlas.
Atlas also gives you the option to build locally on the command line, using our API. (Note that you'll still need an internet connection for this to work.) This is great if you prefer to work locally using your own text editor but still want to see the final output.
Finding Help
For more details on any of the above topics, or for more advanced information, visit the Atlas help and resources page.