Writing in the Visual Editor
Atlas includes a fully functional WYSIWYG editor for writing and formatting your content. To access the editor, just click a file from the project dashboard, and that file will open in editing mode. Atlas has two editor modes—Visual and Code—and supports three markup languages: HTML, AsciiDoc, and DocBook (read more about the editor modes in Editing Environments). The Visual Editor is only available for files written in HTML and includes a number of editing and formatting tools in the toolbar.
Note
It is also possible to edit HTML files directly in the Code Editor. For more information on writing in HTML, see O'Reilly's HTMLBook specification and GitHub.
The Toolbar
Many of the standard formatting tools you're accustomed to in other word processors are available in the Visual Editor's toolbar. From left to right, you've got the following options:
 Bold
Bold-
Bolds your selected text.
 Italic
-
Italicizes your selected text.
 Add a link
-
Converts your selected text to a link for all web formats. In the print PDF format, the URL will be placed in parentheses following the text.
 Add an index entry
-
An index is a collection of key words, concepts, and phrases that are found throughout your project. To create an index entry, place your cursor where the term is discussed within the project text, and then click this button; you'll get a dialog box where you can add an index term, and optionally a secondary and tertiary term as well. When you build, Atlas will collect all of these terms into an alphabetical list linked to the tag locations that you specified. (During production, a freelance indexer will be hired to index your book, so you may not need to use this tool.)
 Add a footnote
-
Inserts a footnote at the current cursor position. Place footnotes where you want the marker to appear in the output, and O'Reilly stylesheets will take care of floating the footnotes to the bottom of the page, adding the numbered markers, etc.
Note
Inline styles such as bold and italic can't currently be added to footnotes via the Visual Editor, but are supported and can be added in the Code Editor. You can read more about footnote markup in HTMLBook here.
 Define a section ID
-
Adds a unique ID to the current section for use in anchoring a cross-reference.
 Insert a cross-reference
-
Creates a cross-reference to a previously created section ID. When you build, Atlas will correctly convert all of those link destinations to include the correct name (e.g., Figure 2-1 or Chapter 5) and page number where relevant. In digital output formats, this will appear as a clickable link.
 Convert to or insert a numbered list
-
If you have some text selected, that text will be converted to a numbered list. If not, Atlas will insert an empty numbered list item to get your list started.
 Convert to or insert a bulleted list
-
If you have some text selected, that text will be converted to a bulleted list. If not, Atlas will insert an empty bulleted list item to get your list started.
 Insert a table
-
This button opens up a menu for you to set up a table that will be inserted at the current location of your cursor. You can set the number of columns and rows, and tell Atlas whether your table should include a header row.
 Embed media
-
Allows you to insert interactive web content, such as video or audio, into your document.
Warning
This feature should not be used for any content that will be printed and/or be placed on the Learning Platform.
 Insert a code block or format inline code
-
If you have some text selected, Atlas will format it as inline code. If not, Atlas will insert a new placeholder code block for you to type in. If you hover over that code block, you'll see a
</>icon at the bottom center. Click this icon to tell Atlas what code language this block uses, so Atlas will know how to apply syntax highlighting when you build.
Figure 6-1. Click the icon to add the language for the code block  Equation editor
-
Allows you to insert formatted math content into your document. The equation editor supports LaTeX markup. See “Math” for more information about using math in Atlas.
 Comment
-
Add comments to the document for your collaborators. Comments are printed in PDF output for your project if the comments option is selected on the Configure page.
 Paste from Word or paste plain text
-
This menu helps with copying over pieces from a Word document or from a plain text file. Paste the text you are copying inside the dialog box that appears, and Atlas will do its best to transfer over your formatting (or strip it out, if you're pasting plain text).
Warning
This option is meant to be used only for short blocks of text, not for entire documents. If you've got an entire file that you want to put in Atlas, the O'Reilly production staff can convert your Word file into an Atlas-compatible format.
 The Insert... menu
-
The Insert... menu is your one-stop shop for adding predefined text blocks to your document. You can add smaller blocks like notes, warnings, and sidebars, or higher-level blocks like chapters and sections (see Using and Adding Sections for more on the latter). To add a block, place your cursor where you want the new block to appear, and then choose the kind of block you want from the drop-down menu. Atlas will insert the pre-formatted block along with some placeholder text that you can replace.
Warning
Not all elements are allowed everywhere—for example, you can't insert a chapter inside a sidebar. If an element isn't allowed, it'll be grayed out in the menu.
Using and Adding Sections
Headings in Atlas correspond to sections. The top-level section is a chapter, and a chapter is divided into sections representing A-heads. A-head sections are further divided into B-head sections, and so on.
Atlas depends on nested sections in your project in order to create a hierarchical table of contents, both visible to readers and for devices like the iPad or Kindle to use in their internal navigation systems. This means that if you want those features to work correctly when you build your project, you'll need to use nested sections to structure your content.
Sections in Atlas can go up to 5 levels deep: Chapter > Section 1 > Section 2 > Section 3 > Section 4.
The special markup is all happening behind the scenes in the Code Editor; all you really need to know is that you should use nested sections for your content (as opposed to free-standing headings).
The steps for adding a new section vary depending on what kind of text element you're currently editing. Generally, you'll follow one of two paths. The first comprises these steps:
- Insert a new paragraph by pressing Enter on your keyboard.
- With your cursor in that new, empty paragraph, go to the Insert... menu, and choose Section.
Atlas will automatically insert a section at the correct nesting level; for example, if you're inside a Section 1, Atlas will insert a Section 2; if you're inside a Section 2, Atlas will insert a Section 3, and so on.
The steps above work great when you're just working with plain text paragraphs, but sometimes you'll need to add sections after more complex blocks like notes, sidebars, code blocks, and so on. If you just press Enter, you'll get a new paragraph inside that block element. To insert a new paragraph after the block, do the following:
- Hover your cursor over the block until you see the ¶ at the bottom right of the block.
- Click the ¶ to insert a new paragraph after the block.
- With your cursor in that new, empty paragraph, go to the Insert... menu, and choose Section.
Warning
If a block element is located at the end of a section, the editor may not allow you to click the ¶ to add a new paragraph after that block. To get around this, you'll need to dive into the HTML behind the scenes:
- Open the Code Editor and navigate to the block element you wanted to add a paragraph after.
- Find the closing tag for that block element. (It'll usually be something like this:
</div>,</aside>,</pre>,</ul>, or</ol>. The / means it's a closing tag, as opposed to an opening tag, which would not have a slash.) - Press Enter immediately after that closing tag, and insert the following:
<p>Some text.</p> - Save and switch back to the Visual Editor. You should now see a new paragraph containing the text "Some text.” after the original block element. You can delete the text and insert a section in that paragraph, or you can press the Enter key either at the beginning or end of that paragraph to insert another new, blank paragraph and add a section there (as described above).
Adding Images
Adding images to Atlas requires a few steps:
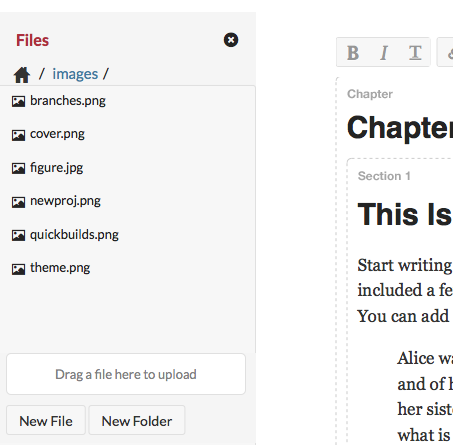
Drag the image into the Atlas file navigator in the left sidebar.
Tip
For organizational purposes, it is recommended that a subdirectory is created to hold all of the images in the project. To create a subdirectory, click the "New Folder" button on the bottom of the Atlas file navigator.
Place your cursor in the text of the project where you want to place the image.
Click the image filename in the Atlas file navigator.
Supported File Types
The Visual Editor will display the following image file types: PNG, JPG/JPEG, and GIF.
We generally recommend using high-resolution images that will work on many devices. For example, a 300 DPI PNG will look good both in a PDF and on a hi-res iPad.
Note
All images will eventually be converted to PNG by the O'Reilly production staff. As a lossless raster image format, PNG is the best format for image files that will serve as the source for both PDF (print) and ebook output.
Cross-References and Internal Links
Cross-references are links from one part of a document to another. These links might point to a section just a few paragraphs away, but could also point to a location in a completely different file.
Atlas has built-in cross-reference support, though it does take a couple steps. To add a cross-reference:
Place the cursor in the section that you want to be the destination of the link, and click the ID button in the toolbar.
In the box that opens, type an
idattribute with any name you like (something descriptive and memorable is probably best—and remember not to use spaces in theidname!). The tool will automatically suggest an ID based on the title of the section.Now go back to the place where you are adding the cross-reference. Select the text that you want to turn into a link, and click the cross-reference button in the toolbar.
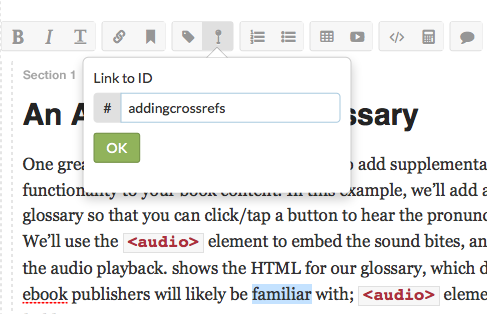
In the dialog box that pops up, type the
idname that you created in the previous step, as shown in the following figure.
That's it! You can move files and sections around while you're writing, and Atlas will update the link when you build to make sure it points to the correct file in your project.
Atlas will also automatically generate link text for you. This is great for referencing chapter numbers or section titles that might change. Insert a cross-reference into a document without selecting any text, and when you build, Atlas will automatically add the title of the section, or the chapter number, depending on what type of element you are referencing.
For example, if you want to point to a chapter in a sentence like this:
Learn more about cross-references in cross-reference.
Add a cross-reference in place of cross-reference. Then, when you build, the sentence will look like this:
Learn more about cross-references in Chapter 4.
If you later add in a new chapter before Chapter 4, the cross-reference will automatically update the next time you build:
Learn more about cross-references in Chapter 5.
Inserting Code Blocks
Adding a code block to a document in Atlas is simple: place the cursor on a new line and click the button.
The Atlas toolchain supports syntax highlighting via Pygments. This allows your code sections to render in final formats with color coding appropriate for the programming language displayed. To take advantage of syntax highlighting, you must specify the language of the code used within each code block.
Setting the Language
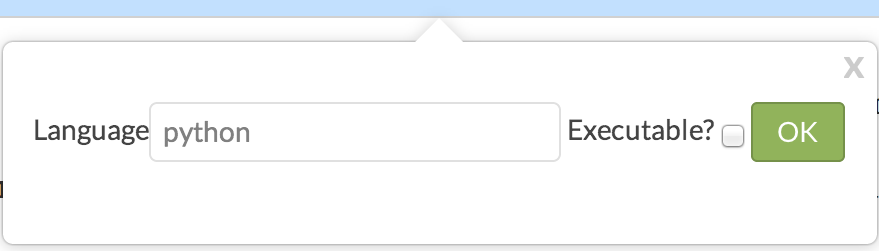
To set the appropriate language for a code block, hover your mouse over the block and then click on the </> bubble that appears.
</> bubble to open the code language dialogThen, type the name of the appropriate language in the box.
Note
Atlas accepts valid Pygments short names in this box. These are case-sensitive and generally lowercase.
List of Supported Languages
Atlas supports syntax highlighting for all languages in version 2.0.2 of the Pygments library, as well as a few others. It is sometimes possible to add Pygments lexers to Atlas's custom library with enough advance notice. Contact toolsreq@oreilly.com for requests regarding a specific project.
Below is a list of some commonly used programming languages with the appropriate Pygments short name in parentheses. For a full list of available lexers, visit the Pygments site.
- C (c)
- CSS (css)
- HTML (html)
- Java (java)
- JavaScript (js, javascript)
- Perl (perl, pl)
- PHP (php, php3, php4, php5)
- Python (python, py, sage)
- Ruby (rb, ruby, duby)
- SQL (sql)
- XML (xml)