Atlas + Git
While it's possible to work entirely within the Atlas web interface, if you want to work with your favorite local text editor or if you want to access Git's powerful tools directly, you can clone your project's repository from Atlas. First, you'll need to pair your SSH public key with Atlas.
Note
While this guide will get you started with a basic example workflow, Git has many other useful features not listed here. You can consult the official Git documentation for more information.
Default branch
New Atlas projects use main as a default branch name. Depending on when they were created, existing projects may have master set as the default name. Atlas documentation assumes main as the default.
An existing Atlas project's default Git branch can be changed to main upon request. Contact O'Reilly production staff for assistance.
SSH Keys
Creating Your Key
Warning
If you're using Windows, we recommend installing Git locally using the msysGit project. This will give you access to a command environment called Git Bash and will also allow you to use the ssh-keygen program mentioned below.
First, check for an existing key by opening up a terminal or Git Bash and entering:
$ cat ~/.ssh/id_rsa.pub
-
If you get output, it should be a long string that starts with "ssh-" and ends with your email address. This is your public key. Copy the whole string, and skip to the next section.
Caution
You'll be asked for your passphrase for this key in a following step; if you don't remember it, proceed with creating a new one.
- If you get "No such file or directory" (or see a string with no email address), you can generate a new key by following these steps:
- In Terminal/Git Bash, type:
ssh-keygen -t rsa -C "your_email@example.com". Make sure to fill in the email address that you use with Atlas. - At the prompt to "Enter file in which to save the key (/Users/you/.ssh/id_rsa)", just press Return.
- Enter a passphrase. You'll need to do this twice.
- In Terminal/Git Bash, type:
You should see output indicating that your key has been created. At this point you can run this command again:
$ cat ~/.ssh/id_rsa.pub
Now you should see a string that starts with "ssh-" and ends with your email address. Copy that string.
Adding Your Key to Atlas
In Atlas, click your username in the top right corner to get to the Account Settings page. Then click the SSH tab.

Under "Add an SSH Key," add some descriptive title (e.g., "local machine"), and then paste the string you copied previously under "Public Key."
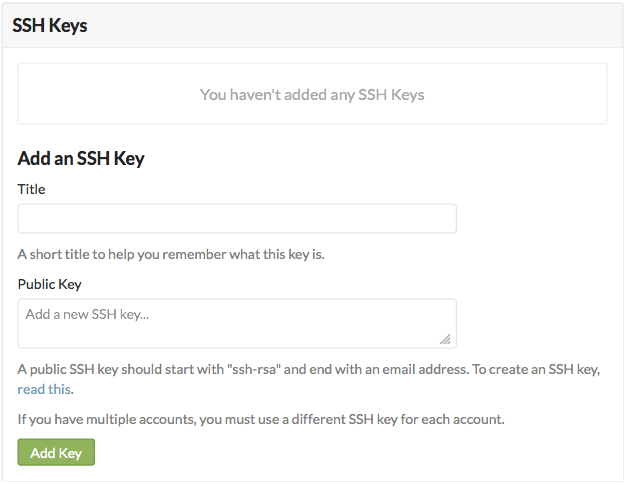
Click the "Add Key" button, and that's it! You should now have the ability to clone down Atlas repos and work with files locally.
Working Locally
Git
Once you've added your SSH public key to Atlas, you're ready to start using Git to work with your project.
Download Git
You can download Git from the git-scm site. Just follow the instructions for your platform.
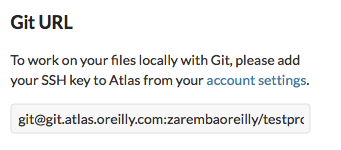
Clone Your Project from Atlas
-
Go to the Project Settings page and copy the git@git.atlas.oreilly.com... URL from the box on the right.
-
From the command line, the
git clone <your_URL>command will to pull down your project's repository. By default, using this command will pull the repo into a directory named by your project name. You can override this by putting a new directory name at the end of the command. -
You'll be prompted for your SSH key passphrase; enter the passphrase you chose when you created your SSH key.
Now you can open and edit your files in your favorite text editor. You can also use Git's command-line tools to perform version control operations not available in the Atlas web app.
Pushing Edited Files Back to Atlas
Once you've made your edits, you'll need to add any new files to be tracked by Git, commit your changes, and then push back to Atlas:
- Add any new files so that Git can start tracking them. Use
git add <filename>to add an individual file. Usegit add .to add all files in the current directory and all subdirectories. - Commit the changes using
git commit -am "commit message". Try to use the commit message to leave yourself a note about what you were doing. For example, if you were just adding a big section on the foo method, you'd add a message like "Added section covering foo." - Push the changes back up to Atlas using
git push origin main.
Warning
My Push to Atlas Keeps Getting Rejected
If you're getting a message that your changes are rejected, it's most likely because someone has changed the files on Atlas since you started working locally. To fix this, you'll need to commit your current changes and then use git pull origin main to pull in the changes from Atlas. Once you've synced the changes, you'll be able to push your work back up.
Getting a Diff
You can use Git to get a diff between the files in your local checkout and the files on Atlas. To do this, use git fetch:
$ git fetch origin
Password:
remote: Counting objects: 5, done.
remote: Compressing objects: 100% (3/3), done.
remote: Total 3 (delta 2), reused 0 (delta 0)
Unpacking objects: 100% (3/3), done.
From https://atlas-admin.oreilly.com/git/1230000000065
   92d4f99..e9fbbe2  main     -> origin/main
This fetches the changes into a local branch, but does not merge them in automatically.
Once you've fetched, you can use this command to see the files that have changed between your local copy and the remote copy:
$ git diff --name-only main..origin/main
This command will just give you the list of files. If you want to see the actual differences, just leave off the --name-only flag. Once you're satisfied that nothing nefarious is in there, you can merge in the changes you just fetched using this command:
$ git merge origin/main
Git Quick Reference
Here are some of the key terms you'll need to understand to use git:
- Local repository
- A Git repository that is on your local drive. You can make any changes you want to this copy without affecting files in other remote repositories (see below).
- Branch
- A named version set of files within a Git repository. The default name is "main."
- Remote repository
-
A named link to a Git repository in another directory or on another machine. You can have as many remote repositories as you want. The repository from which you have cloned your local repository is named "origin" by default, but you can choose any name you like when you add new "remotes."
- Push and pull
- Git lingo for sending the changes made in a local repository to a remote repository, or vice versa.
- Cloning
- Downloading a remote Git repository onto your own machine so that you can edit it locally.
- Commit
- A commit saves all your changes under version control.
The following table summarizes some commonly used commands.
git init |
Creates a new blank repo |
git commit -am "Your commit message" |
Commits changes to the repo |
git status |
Returns the commit status of the current repo |
git add * |
Adds all files to the repo |
git remote add remote_name remote_URL |
Adds a remote repository to which you can push or pull changes |
git remote -v |
Lists the remotes in your repo |
git push remote_name branch_name |
Pushes changes from the specified local branch specified to a remote repo. We’ll mostly use git push origin main |